Learning how to delete a database in MySQL is an important part of managing your database and keeping it organized. This article will provide step-by-step instructions on how to do this effectively and safely.
It is intended for users who have some experience in using the MySQL database management system, as well as a basic understanding of SQL commands. By the end of the article, you will have all the knowledge necessary to confidently delete a database from MySQL.
Step 1: Accessing the Database
For those who handle large amounts of data, the ability to delete a database in MySQL is an essential skill. Knowing how to delete a database can help you manage your data and keep it secure.
If you are unfamiliar with MySQL and need assistance deleting a database, this article will provide step-by-step instructions on how to complete the process quickly and safely. Additionally, techniques for recovering a deleted database will be discussed in case of accidental deletion.
Also Read: Web Design Package How To Choose
Step 2: Selecting the Database to Delete
Now that you have successfully logged in to MySQL, the next step is selecting the database you wish to delete. Before deleting any database, it is important to make sure that it contains no valuable data as deleted databases cannot be recovered. That said, a few tips can help guide your decision when selecting the database for deletion.
First, consider whether there are any other users who may need access to the same database. If so, discuss with them what should happen with the existing data and how they will be able to obtain their needed information afterward.
Second, make sure that all of the associated tables within the database have been backed up or exported if necessary before proceeding with deletion. Finally, if you are unsure about deleting a particular database, consult an expert before taking action as this could potentially lead to serious consequences if done incorrectly.
Also Read: Is Web Developer A Stressful Job?
Step 3: Confirming Deletion
Deleting a database in MySQL is an important step to take when you no longer need the information stored on it. The process of deleting a database is easy and straightforward, but confirming the deletion is equally as important. Once you have deleted your database, it’s imperative that you confirm its absence in order to ensure that the data can no longer be accessed by malicious actors or anyone else with unauthorized access.
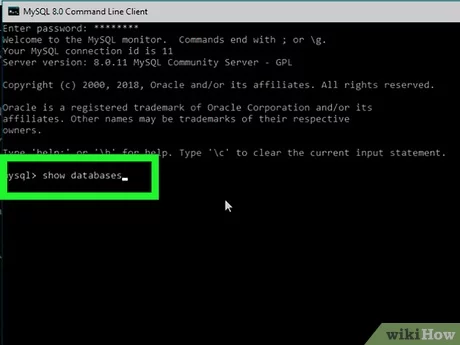
Confirming the deletion of your database requires the following three simple steps. Firstly, open up the MySQL command line client and log in using your credentials. Secondly, type “show databases;” into the console to view a list of all available databases on your system; if your recently deleted database does not appear in this list, then its deletion has been successful and confirmed.
Also Read: Is Web Developer A Hard Job?
Step 4: Checking the Status of the Deletion
When deleting a database in MySQL, the fourth and final step is to check the status of the deletion. After entering the DROP DATABASE command, you should immediately see a message confirming that your database was deleted. To confirm its deletion, you can use two methods: checking the error log or querying for databases with system commands.
To check the error log for confirmation of the successful completion of your command, open it and browse for any messages related to deleting your database. If all went well, you should see a message stating that it was successfully dropped from MySQL server memory. You can also query for databases using system commands such as SHOW DATABASES or SELECT * FROM information_schema.tables; this will show all available databases on your server memory and verify if yours has been removed from its file structure too.
Also Read: Can I Become A Web Developer In 3 Months?
Conclusion
The conclusion of this article has highlighted the various steps required to delete a database in MySQL. After logging into the server using the root user, a user must open up their terminal window and use the command “DROP DATABASE” followed by the name of their chosen database. This will effectively delete all data associated with that particular database.
To ensure the complete eradication of any unwanted databases, users may wish to run a query on each table individually, which can be done using “DROP TABLE” followed by each individual table name. This can be very time-consuming if there are many tables involved, but it does provide peace of mind for those who wish for a full deletion process. Finally, users should always remember to back up their data prior to deleting any databases as this is an irreversible process that cannot be reversed once completed.


Be First to Comment